Monday, March 5, 2012

Springtime baby set


It's spring-time. The air is warming, the sun is golden, and ... friends are having babies. Whee!

I'm posting my first finished project in ages. Though I've been knitting over the past year, and I've finished a few projects, this is the first one I felt like sharing :) Made for my friend Marcus's first baby, who arrived in the past few weeks :)

Yarn: Madeline Tosh DK in Ivy

Modified slightly for gauge -- and I didn't like the look of the applied I-cord buttonholes, so I went with sewn-on buttons over snaps! The sweater took more than one ball of yarn, but far less than two, so I made a hat as well. Supplies came from the new Fancy Tiger location. Now just have to mail the sucker before the baby can walk!

Just ready for a hug!

Wednesday, January 20, 2010

How-To: Decorative Two-Color Braids

I've received a few inquiries regarding how I made the decorative ties on the Iceland Hat. And I'm not surprised: I think they add a particularly homey, festive touch. As with buttons, frog closures, etc, I think there's something very attractive about being invited, visually, to understand the way things go together.


And this particular cord is a favorite of mine. Made out of four strands and two colors, this braid riffs on the look of stockinette stitch by creating a column of nested V's in alternate colors. I think this would work particularly well as a complement to Nordic-style mittens or hats worked with knitted two-colored braids.

So without further ado, here is a brief tutorial! (Excuse the blurry photos; I'll try to have better soon).

For cords attached directly to the tassels, start with two strands of yarn, in Color A and Color B, each strand about 2.6 times the desired length of the braid. With a tapestry needle, thread the strands underneath the anchor string at the top of the tassel.

Pull the strands through halfway, so that each of the four ends is the same length (and consider tying an overhand knot for neatness and durability). Arrange the strands so their colors are ordered "A, B, B, A".

Create the braid using the following two steps:


1) Cross the right-most strand over its left-hand neighbor.


2) Cross the left-most strand over its two right-hand neighbors.

Repeat!

Properly executed, the strands moved in 1) and 2) should always be the same color, and at the end of the repeat the two strands should be crossed in the middle.

For additional clarity, here's a horrible MSPaint diagram. Good luck!

Monday, January 18, 2010

The Iceland Hat

After a long hiatus from posting (and knitting), I bring to you my favorite hat ever:


The Iceland hat, alternately titled Capucine, had its start in my brother's birthday present to me: a gift of two balls of lopi in a beautiful, heathered blue ... carried by hand back from Iceland.

I'm always impressed with my brother. I don't think that many people would manage to get exactly the right color. Maybe it's because he has blue eyes, too!

So I've been on the lookout for a pattern to use this yarn in. Many of you will be familiar with lopi, thanks to the Reynolds line by the same name. The style of yarn seems to be an old standard of Icelandic knitting. The yarn is constructed from fairly long fibers of wool (staples!), simply twisted together without being plied for strength. So it has a sort of nature-ish, haloed, thick-thin thing going on. All in all, it's thick, hearty and lovely, evoking the "unprocessed" quality that brings such big bucks at Whole Foods. It needs a pattern that allows this quality to shine through; I find it can easily be overpowered by complicated cables and textures.

Because of that, I wasn't sure what to make with it, since lately I favor fine (and highly-processed) yarns in patterns meant to show off complicated stitch-work.

A search on Ravelry of free hat patterns quickly yielded a winner. And in spite of my general preference for more complicated knitting, this hat's structural interest, fit, and gorgeously outrageous tassels manage to showcase the yarn perfectly (IMHO), and I find myself fabulously pleased with the results. Totally cute.


Technical details:
I found my row gauge was a little off - I found it necessary to knit more rows than were indicated in the pattern, for all three sections: the ribbing, the garter stitch section, and the in-the-round crown.

I also decided that I liked the look of a proportionately wider garter-stitch section, so the first five or so rounds of the crown are in garter stitch. I inserted extra rounds of stockinette before the crown decreases.


The tassels (so fun!) are made according to these instructions, with the lopi and a few strands of a coordinating sock yarn I had lying around, to give them some textural interest and pick up some of the undyed strands of the lopi. I made them detachable, using decorative cords, so as to be able to wash the hat without damaging them.


Tuesday, June 2, 2009

Tech-link-al Tidbit

Dear Dad:

I know you only got your Dad Scarf in March, and now it's totally summer where you are. So you're probably not using your scarf at the moment. But it just occurred to me that, reading my blog post about it, you might have wondered why the picture of it looks so nice and flat when (in all likelihood) by the time the present reached you in the mail all my careful blocking had been undone and it looked more like a tube.

A valid question.

So I thought I'd share a link that discusses just such an issue, in bountiful detail! TECHknitter's explanation is also a great example about why TECHknitting is one of my very favorite knitting blogs. So mathy!

Thought you'd enjoy.
-Your daughter

P.S. Dad -- if it's really unwearable, I can try to block it for you again. Let me know next winter ;)

Tuesday, May 19, 2009

At Last My Love Has Come Along

greensweater_01

Here's a finished project that I've finally gotten photos for. (Thank you, Jay! You're hired!)

Please excuse the flood of photos. I'm just pleased as punch to have had a real, live photographer to help me out!
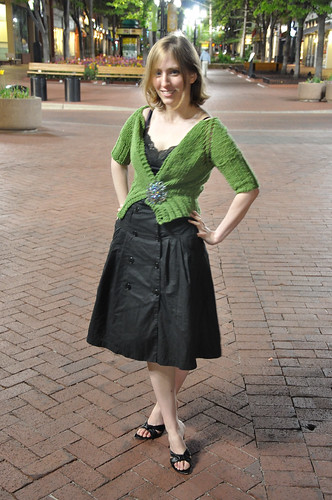
greensweater_02

The pattern is Ubernatural by Stephanie Japel. Word of warning: this pattern has errors in it, and I wouldn't recommend it for a knitter who isn't confident adjusting the "recipe." Notes below.

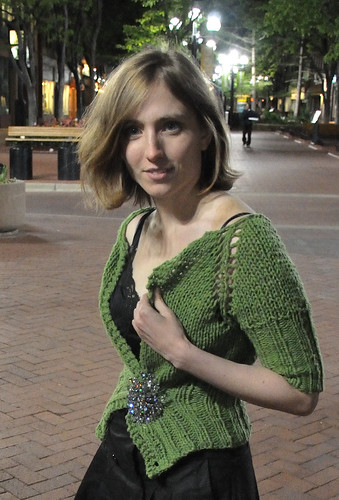
The yarn is the green merino I salvaged some time ago. Although the yarn itself is two strands of worsted-weight held together, as the pattern recommends, it wasn't quite "bulky" enough to get gauge.

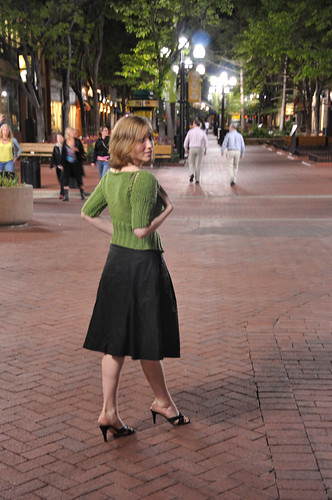
Still: this is a very wearable little sweater when I want some warmth in the cool Colorado evenings! Here, I was dressed up for the premier of Sex, God, Rock 'n Roll, Boulder's very first nationally-broadcast cable TV show!

rsz_greensweater_16

So, the notes. Two things seem off. The first is that the raglan increases, as written, won't work. If you purled one of the YO's, maybe, but it doesn't give you the nice paired-increases in the picture. I'd replace them with the instructions "yo pm yo" in row 2 with the instructions "yo pm k1 yo", and thereafter on RS rows "knit to marker, yo, pass marker, k1, yo". The effect is to add a stitch between increases. This is necessary. This also requires shuffling some stitches around. See below.

The second is a little less straightforward. The instructions for the small size say "CO 40", and row 2 sets up the distribution of stitches: "Make buttonhole, knit 7 [for right front panel] yo pm k1 yo [for raglan increase], k4 [for right shoulder], [raglan increase], k18 [for back panel], [raglan increase], k4 [for left shoulder], [raglan increase], k7 [for left front panel]." Sounds OK. But here's the problem:

The button bands are knitted with the rest of the garment, with the first and last three stitches of each row done in garter. That means that the front is effectively only 11 stitches in width, compared with the back's 18. Uh oh!

There are two ways to fix this problem. The first is to size-up and cast on extra (that's four extra for corrected raglan increases and about six extra for the button bands) and work as follows: "Work 3 in garter stitch (making buttonhole), k7, increase, k4, increase, k18, increase, k4, increase, k7, work 3 in garter stitch."

The second fix would be to pull the extra increase stitches from the back panel, knitting row two as follows: "Work 3 in garter stitch (making buttonhole), knit 4, increase, k4, increase, k12, increase, k4, increase, k4, work 3 in garter stitch." I believe this is what Ms. Japel intended. Choose your fix depending on your gauge: the first will have 82 stitches at the bust, the latter 72. I chose the former, and mine was still pretty darn tight. But pretty!

Friday, April 24, 2009

Dad's Man Scarf

Men are hard to knit for. No matter what I do, the yarns, colors, and patterns I tend to like turn out girly. No good for men. So my poor father has been waiting for years on a knitted gift. Socks have languished in the forgotten WIPs bag; hats have failed before they were begun. But here, at last, is a project I was happy to gift to my beloved Dad.

P1010101

This is Jenna Jenks' Braidy Scarf done in Tahki (that's TAAAAAAH-ki, apparently) Sedona, a beautiful worsted wool-silk blend tweed. The pattern, though shamelessly lifted from The Gap, is a real pleasure to knit: minimal, easy, and completely stylish. Dad, I hope you actually get some use out of it!

Tahki Sedona is also a real pleasure to work with. The colors are reserved and gorgeous, and the wool in the silk gives it that little hint of crinkle that I love. I chose it initially because it was the only tweed yarn that didn't look like it came from a candy store, and I ended up entirely pleased by this choice.

For anyone who happens to want to knit but thinks they don't have the skills to make something beautiful, I recommend you try this pattern! It looks beautiful in chunky yarns, too, so it takes only a minimal yarn investment (the pattern calls for Lyon brand Wool-Ease Chunky, about $3 a ball) The two braided cables provide the only moments of breath-holding, and with a little faith and courage I'm certain that anyone can get past them. Believe me, the gratification is worth it!

Tuesday, April 7, 2009

Jaywalker Socks

Finally, a new post.

A classic pattern, done in Oasis Yarn Aussi Sock, my Jaywalkers have been a lot of places. An attractive, simple pattern makes for a great traveling project!

IMG_0396

I began these on a trip to Steamboat Springs with some friends, finished the first one on the plane to the southernmost tip of Argentina, and finished the second aboard the Lindblad Explorer in Antarctica. I believe there were four women on the ship who were knitting socks! Go figure.

IMG_0397

This yarn is definitely not my favorite. The colors are really nice, and the dying creates beautiful stripes. But as you can see from the picture, it has problems with pilling. The picture was taken after one or two wears, and they look very worn. Still pretty, though.

For all that this is a simple pattern, knitting these was not entirely easy. The first time around I found (as many people have) that the sock was impossibly tight; to get it to fit over my heel, I had to rip it out and knit a larger size. I also had.. must confess... gauge issues, ugh! The second was much looser. To get them to look the same, I knitted the second in a smaller size. And thought I don't think it is very noticeable, I'm not going to post pictures of them both! Illusion of perfection preserved!